October 28, 2011

Shanghai Red Bean Crêpe

I have some left over red bean paste nicely stored in the fridge . Thinking what to do with it since Aspiring Bakers #12 is going to end soon , I stumble upon this very nicely wrap egg crêpe call Shanghai Red Bean Crêpe.

The recipe looks pretty simple to make. Quickly in action ,LOL , I heat up my non-stick pan , lightly grease with cooking oil and started weighing the flour needed.
It took me less than 10 minutes to prepare these simple delicious crêpe. My baby actually gnawed at the crêpe , lol, that was really an interesting one to watch .


Ingredients 
For the Filling
9tbsp   Red Bean Paste ( for recipe get it here )
For the Crêpe
1          Large Egg
3/4cup  Cold water
1/2cup  All Purpose Flour
1/4 to 1/2cup Cooling Oil

Method
  • Beat the egg and cold water until thoroughly mix
  • Sift flour in a mixing bowl . Add egg mixture to the flour and whisk till batter is smooth 
  • Heat up a non-stick pan , lightly greased with cooking oil. Add 3 tbsp of the batter in the pan and tilt to coat evenly . 
  • Once the crêpe is set, spread 2-3 tbsp of red bean paste on the crêpe forming a rectangular shape
  • Gently fold in the outer edges of the crêpe to form a rectangular shape
  • After folding and forming all crêpes into rectangular shape , semi-deep fry the crêpe in hot oil till crispy 
  • Dish up and let cool for 10 minutes 
To Serve
  • Slice the crêpes into 4/6 bite-sized pieces and serve with fresh fruit or toasted sesame seed . Enjoy !!
Recipe adapted from Apple Pie , Paties & Patê
I am submitting this post to Aspiring Bakers #12: Traditional Kueh ( October 2011 ) hosted by SSB of Small Small Baker

October 27, 2011

Steam Pandan Huat Ge

My friend Esther , left a comment on my post , asking for a healthier version of Huat Ge instead of using Eno. I was stuck for 1 minute as to what kind of ingredients should I use to substitute Eno in order for the Huat Ge to boost and "huat " . Then I reply her and say , I will try out this Huat Ge and post it as soon as possible .

I quickly heat up my steamer , line the moulds and get my super blender set up . It will be a great idea to make this for Justin and Natalie's breakfast .
See that smiling Huat Ge? I feel so satisfy the moment I open the steamer lid to see the Huat Ge smiling at me . LOL

Ingredients 
250g    Self Raising Flour
120g    Sugar
250ml  Low Fat Milk / Coconut Milk ( own preference )
1 tsp    Double Action Baking Powder
1 tsp    Pandan Paste /  1 tbsp pandan juice
A few drops of green colouring ( optional as I did not use this )

Method 

  • Add all ingredients in a blender and blend till all well combine ( make sure no more lumps ) 
  • Fill the cupcake mould till 80% full 
  • Steam over high heat for 20 minutes ( depending on the size of the cupcake mould using ) 
  • Remove from steamer and let cool for 5-10 minutes before serving . Enjoy your Pandan Huat Ge !!
This recipe was a trial and error test . Happy trying ..

I am submitting this post to Aspiring Bakers #12: Traditional Kueh ( October 2011 ) hosted by SSB of Small Small Baker

Chinese Steam Cake aka Ji Dan Gao

Each time I pay a visit to the Kueh Stall near my mom's house , I will definitely buy the Ji Dan Gao sold in the stall. Ji Dan Gao always have the attraction to make me want to eat it . Without knowing that Ji Dan Gao is so easy to make, I will travel the world  heehee not really , I will travel  to get to the stall , just to buy Ji Dan Gao . Gosh , imagine how much time I have wasted. LOL ...

Ingredients
160g   Self Raising Flour
150g   Castor Sugar
180g   Egg ( weigh with shell )
1/2 tbsp Ovalette
1/2tsp Vanilla Essence

Method

  • Add all ingredients in a mixing bowl and beat at high speed for 7-8 minutes 
  • Pour into a 9" basket lined with baking paper 
  • Using an oiled knife , slice a cross sign on top of the batter 
  • Steam at high heat for 30 minutes . Voila you are ready to serve Ji Dan Gao ... Enjoy 

Recipe adapted from ReeseKitchen
Check out the fluffy texture of the Ji Dan Gao 

I have made this cupcake look alike Ji Dan Gao for Justin and Natalie's breakfast ....

I am submitting this post to Aspiring Bakers #12: Traditional Kueh ( October 2011 ) hosted by SSB of Small Small Baker

Tau Sar Piah

When we were younger , mom used to bring us back to her hometown in Penang during Chinese New Year and school holiday. I simply love Penang food so much especially the Tau Sar Piah . Mom will make it a habit to buy few boxes of fresh bake Tau Sar Piah back home .

Those were the days where mom will always think of us when it comes to good food. Its all different now that we are all grown up. LOL. Its has became a norm for us to buy a few boxes of Tau Sar Piah home for mom whenever we happen to travel to Penang . My brother David , who came back from US to visit us , went for a 3 days trip to Penang . When he actually came back to KL , we saw him holding 2 boxes of Tau Sar Piah , and we went smiling at each other .LOL.
Since I have some left over mung beans in the fridge , I was thinking to try my hands on making homemade Tau Sar Piah , I mean a healthier version of Tau Sar Piah to be exact . Heehee.... I rea;;y didn't know that it is so easy to make Tau Sar Piah at home .. The results : SATISFYING , DELICIOUS , YUMMY , ........


Ingredients 
For the Flaky Skin I have used the same ingredients and method from my previous post . ( get the recipe here )

For the Filling
300g    Mung Beans
5          Shallots ( Skinned and thinly slice )
5tbsp   Cooking Oil
5tbsp   Sugar
1/2tsp  Salt

Method
  • Soak mung beans for 2 hours . Drain and steam over high heat for 40 minutes till beans are cooked 
  • Mashed the mung beans while still hot add in sugar and salt 
  • In a pan, heat up oil and stir fry shallots till crispy and golden brown
  • Add in mashed mung bean and fry over low heat till dry and rollable into round balls
  • Dish up and divide mung beans into 20g portion and roll into round balls shape
To assemble :
  • Divide both water dough and oil dough into 10 portion each ( 10 portion water dough , 10 portion oil dough ) 
  • Flatten one piece of water dough and wrap one portion of oil dough in it . Pinch to seal edges
  • Using a rolling pin, roll it flat into long strip . Roll up like a snail to form a cylinder, turn the dough 90 degrees, with the end facing up. Roll again into a long thin strip
  • Using a sharp knife or pastry cutter , cut the cylinder in the middle into 2 equal pieces. With the cut side facing down , flatten the dough, making edges slightly thinner than the centre. Leave a little hump in the centre in order for the dough to be evenly thick all around when wrapping the pastry
  • Wrap filling and pinch to seal. Try no to tug or pull too hard, otherwise the layers will tear
  • Place sealed side down on lined baking tray and brush with egg wash . Bake for 30minutes until the top and bottom are a light golden brown
Voila your Tau Sar Piah are ready to be served !!!!
I like the flaky texture , except for a few ones that I shape into Round Tau Sar Piah  shape .. yummy !!!!


October 26, 2011

Happy Deepavali

Wishing all Hindu friends a Happy Deepavali and Happy Holiday !! Guess what , I receive gifts for Deepavali too ... LOL . Sweet yeah . Thank you to my lovely friend Rejina . She gave me some of her homemade Muruku .. It is so tasty and irresisitable . Man , I guess I really love good food eh, heehee....

Homemade Mee Hun Kueh

For generation , pan mee has been our family's all time favourite. Maybe I should just name my blog as " My Family All Time Favourite" , LOL. Cooking homemade pan mee has been a norm to our family . Whenever I told my mom that I am gonna cook pan mee , she will definitely say " good , good ".

Happily , whoever that is free to help will definitely help up to prepare ingredients to make pan mee. I will definitely be the one to prepare the dough . Mom will be the one to help preparing the soup and all . One little secret to share , although I know lots about cooking and all , I actually do not have the skill to fry crispy shallot. LOL. Mom laughed at me saying " Man , I didn't know you actually don't know the secret of frying crispy shallots " .. and she went like .. wahahahahahahahha all the way . I was really blushing at that time yeah. Thanx to my mom . heehee. At least I got the tips and secrets of frying crispy shallots from her after her big fat laugh. Worth it though.. LOL


PAN MEE

Ingredients
Garnishing
20       Shallots ( thinly slice and fry till crispy and golden brown )
5         Mushroom ( soak for 1 hour till soft, clean and slice thinly. Stir fry with 1 tbsp of oil & soya sauce )
300g   Anchovies / Ikan Bilis ( clean and fry till crispy )
Some Green vegetables ( own preference )
For the Soup 
500g   Spare Ribs ( can be any other bones or meat to be used as soup base )
500g   Anchovies /Ikan Bilis ( clean and fry till crispy )
3liter   Water
2pkts   Dongcai /冬菜 ( winter vegetable ) 


Method
  • Bring water to boil . Add in spare ribs and boil over low heat for 1hour . 
  • Add in pre fried anchovies and Dongcai. Continue to boil over low heat for 2 hours 
  • Add salt and pepper to taste. 


For the Dough/ Pan Mee
1kg     Plain Flour
1cup   Water
5tbsp  Margerine

Method 

  • Sift plain flour in a mixing bowl. Make a well in the middle and add water gradually till all flour stick together . Do not worry if its too dry as long as the flour stick to be one dry ball
  • Add margerine one tbsp at a time. Knead till all margerine absorb before adding another tbsp. 
  • Continue kneading to form a smooth pliable dough. Shape into one big ball. Pad the surface of the dough with margerine . 
  • Cover the dough to rest with a damp cloth . Leave aside to rest for 2 hours in the fridge 
To Cook Pan Mee 
  • Using a sauce pan, scoop 3-4 cups of the pre boiled soup into the sauce pan and bring to boil 
  • Remove a small piece from the dough and roll into thin sheet ( depending on own preference ) . Tear the pan mee using your hand as a scoop and add into the boiling soup . Cook the pan mee for 5 minutes 
  • Pick some vegetables and add into the boiling soup . Stir for 1 minute .
  • Dish up and serve immediately with fry anchovies , shallots,mushroom and cut cili padi .Voila !!! You are ready to serve your delicious bowl of pan mee... Enjoy !!


October 25, 2011

Abok Abok Sago #1

I brought my baby and mom to Jusco for some shopping over the weekend. I was busy looking at some dried condiments when my baby accidentally grab a packet of white pearl sago. He was kind of excited to learn that his hand can actually reach for things hanging on the wall rack. Happily passing the packet of sago to me, while I was laughing at him.

While holding the sago , I suddenly have the urge to try my hand at making some Abok Abok Sago . Tired of eating those red rose flavour Abok Abok Sago sold in Malay stall , I have then search all over the web to find varieties of Abok Abok Sago . Voila !! I found this , one very interesting post . So I decided to make this for teatime snack... heehee .....
Amazing, amazing , amazing, this Abok Abok Sago turn out to be a hit. Baby actually ate 2 of this and Nat ( may daughter - the never like any food except for sausages and pork belly little monster ) manage to finish 1 1/2 all by herself. LOL... I am sure gonna make this again. Yippeee !!
Pandan Flavour as the top layer , Gula Melaka flavour as the bottom layer . Believe me this is really a delicious Abok Abok Sago. My mom classify this as the best Abok Abok Sago she ever tasted .

ABOK ABOK SAGO
Ingredients 
100g    Grated Coconut
A pinch of Salt

Method
  • Mix grated coconut and a pinch salt . Steam over high heat for 3 minutes 
  • Set aside to cool 
For Pandan Layer
50g     Pearl Sago
50g     Castor Sugar
50g     Grated Coconut
1tbsp  Pandan Juice  ( or 1 tsp Pandan Paste )
A few drops of Green Colouring ( might not need this if using pandan paste )
A pinch of salt

Method
  • Soak sago in water for 15 minutes. Wash under running tap to get rid of excess starch . Drain well in a metal strainer 
  • Mix sago , grated coconut and salt in a mixing bowl. Add pandan juice and green colouring , mix well 

For Gula Melaka Layer
50g      Pearl Sago
30g      Castor Sugar
50g      Gula Melaka ( finely grated / chop )
50g      Grated Coconut

Method
  • Soak sago in water for 15 minutes. Wash under running tap to get rid of excess starch . Drain well in a metal strainer 
  • Mix sago , grated coconut and salt in a mixing bowl. Add gula melaka and mix well
To assemble
  • Grease a 10cm square baking tin lightly with cooking oil ( I use agar agar mould instead ) . Spread the pandan layer on the base and press firmly 
  • Steam over medium high heat for 15 minutes
  • Remove baking tin from steamer and spread the gula melaka layer over the green portion. Press down firmly and steam over medium high heat for 25 minutes 
  • Remove from steamer and leave to cool completely before cutting . Coat each piece of Abok Abok Sago with grated coconut 
Recipe adapted from Kuali


I am submitting this post to Aspiring Bakers #12: Traditional Kueh ( October 2011 ) hosted by SSB of Small Small Baker

Ondeh Ondeh

Ondeh Ondeh - does this sound funny to any of you ? LOL , it does sounds funny to me even though I am a Malaysian . Back when I was younger , I used to love Ondeh Ondeh . Maybe because of limited choices of foodies available in my home town where I was brought up, I have always love Traditional Kuih .

I remember the last time I make this was 14 years ago , gosh now that I realise I am ageing so fast . LOL. Well time flies without me realising . For all the food lovers out there , enjoy your food to the fullest . ;)
Time flies that I only realise Aspiring Bakers #12 is going to end . OMG ... I gotta be fast to post all my Kuih Muih before month ends. October has been a real busy month for me. I hardly even have time to spend with my baby , makes me feel really guilty about it. Well I promise to readjust my schedule and spend more time with my little ones . They are all that matters anyway, agree? LOL ..

And I shall not continue with the winding and all......heehee

Ingredients 
250g    Glutinous Rice Flour
30g      Tapioca Flour
235ml  Pandan Juice ( extract from 20pcs of pandan leaves blend with 250 ml water )
100g    Gula Melaka ( I prefer it in chunk so I didn't chop it finely , I chop it into smaller chunks instead )
100g    Grated Fresh Coconut
1/4tsp  Salt

Method

  • Combine grated coconut with salt and steam over high heat for 5 minutes . Set to cool
  • Combine glutinous rice flour and tapioca flour in a mixing bowl. Add in pandan juice gradually and knead till form smooth dough 
  • Bring a pot of water to boil . Divide dough into 10g portion
  • Flatten the dough lightly and spoon 1 tsp of Gula Melaka onto the centre of the dough . Seal it and shape it into round balls
  • Cook the ondeh ondeh balls in the pre boil water . When the ondeh ondeh balls float on the surface , continue cooking for another 1-2 minutes 
  • Remove the ondeh ondeh balls and coat it with grated coconut . Voila , you are ready to serve your Ondeh Ondeh 

Recipe adapted from Sonia aka Nasi Lemak Lover
I have opt to use lesser filling as my family are not a big fans of sweet foodies .. ;) 
I am submitting this post to Aspiring Bakers #12: Traditional Kueh ( October 2011 ) hosted by SSB of Small Small Baker

October 24, 2011

Ang Ku Kueh #2

After my first attempt in making ang ku kueh , I have decided to try a different version of ang ku kueh . This time around , I have decided to try making the ang ku kueh skin using natural ingredients instead of colouring . My all time favourite: Pumpkin . I simply love the natural Golden Colour of pumpkin flesh.
It makes the room glows whenever I make anything using pumpkin ... heehee . That was what my mom says when she saw this cute little golden pumpkin ku kueh .

Ingredients 
300g    Pumpkin Flesh
200g    Glutinous Rice Flour
1tbsp   Rice Flour
2tbsp   Sugar
3tbsp   Corn Oil
180ml  Water ( might not need water at all as I did not add any )
Before Steaming ...........the ever glowing golden ang ku kueh 

Method

  • Steam pumpkin flesh till soft , about 15 to 20 minutes over medium high heat 
  • Mashed pumpkin and add in glutinous rice flour , rice flour , sugar and corn oil . Knead to form soft pliable dough . Set aside for 30 minutes 
  • Divide dough into 25g portion ( depending on the size of the mould ) 
  • Flatten the dough and wrap the mung bean filling ( get the recipe here ) with the dough
  • Grease mould with cooking oil and press dough into the mould. Knock the mould gently to dislodge the ang ku kueh and place it on a piece banan leaf
  • Steam the ang ku kueh over medium heat for 8-10 minutes ( for medium size ang ku kueh ) / 5-8 minutes for small size ang ku kueh 
  • After 4 minutes of steaming , open lid to let out excess steam ( in order to get nicely shaped ang ku kueh )  
  • Remove from steamer and set aside to cool before serving . Enjoy yeah !!!

Recipe adapted from ReeseKitchen

I am submitting this post to Aspiring Bakers #12: Traditional Kueh ( October 2011 ) hosted by SSB of Small Small Baker

ANG KU KUEH #1

Mom has been nagging me to try making our own ang ku kueh. The thought of making ang ku kueh makes me kind of lazy to move my butt from the chair. I have no experience in making chinese kueh at all. After making 'Kuih Dadar ' , I suddenly have the confident to make ang ku kueh .

I drove myself to the bakery supply store wanting to buy ang ku kueh mould. After making 2 rounds around the shop , I left the shop without buying anything . I decided to make use of my mooncake mould instead. LOL ...
Well, I would say I just want to make use of my mooncake mould for the time being till I mastered the skill of making Ang Ku Kueh . Cute eh ... LOL . The results : Delicious Ang Ku Kueh with sweet mung bean filling . Even my brother David who came back from the US to visit us , can't resist this cute little Ang Ku Kueh.


Ingredients

For the Skin 
300g    Glutinous Rice Flour
200ml  Coconut Milk
2tbsp   Sugar
7tbsp   Cooking Oil
A few drops of red colouring
A pinch of Salt

For the Filling
300g   Dried Mung Bean
125g   Sugar  ( Adjust to own liking )
1tbsp  Cooking Oil
150ml Water
2-3      Pandan Leaves


Method
For Filling  
  • Soak mung beans for 2 hours . Drain place into a steamer plate /pan with pandan leaves . Steam over medium high heat a for 45 minutes to 1 hour until beans are cook
  • Remove from steamer and blend or mash till fine while still hot [ mung beans will turn hard when cooled ) 
  • Boil sugar with water and pandan leaves till sugar dissolves . Add mashed mung bean and continue stirring over low heat until dry and rollable . Dish up and set aside to cool. 
  • Divide Filling into 20g portion and shape into round balls 

For the Skin 
  • Remove 50g glutinous rice flour and mix with 100 ml water in a sauce pan. Cook over low heat , stirring continuously until form thick paste 
  • Boil coconut milk with a pinch of salt and pandan leaves . Once boil , set aside to cool 
  • Sift the remaining 250g of glutinous rice flour on the table . Add sugar and red colouring , mix well.
  • Add coconut milk gradually and knead for a while. 
  • Add in the cooked dough and knead adding oil gradually until dough is smooth and pliable . Let rest for 30 minutes 
  • Divide dough into 25g each ( depending on size of the mould using )
To assemble
  • Clean banana leaves and cut into desired shapes ( slightly bigger than the mould as leaves will shrink after steaming ) and lightly grease with cooking oil
  • Flatten one piece of dough and wrap filling . 
  • Grease mould with cooking oil and press dough into the mould. Knock the mould gently to dislodge the ang ku kueh and place it on a piece banan leaf
  • Steam the ang ku kueh over medium heat for 8-10 minutes ( for medium size ang ku kueh ) / 5-8 minutes for small size ang ku kueh 
  • After 4 minutes of steaming , open lid to let out excess steam ( in order to get nicely shaped ang ku kueh )  
  • Remove from steamer and set aside to cool before serving . Enjoy yeah !!!

I am submitting this post to Aspiring Bakers #12: Traditional Kueh ( October 2011 ) hosted by SSB of Small Small Baker

October 17, 2011

KUIH DADAR

I was happily scrolling thru the post submitted for #Aspiring Bakers 11 , when I decided to look at what's coming up on Oct . I was excited when I saw what was coming up on Oct. Honestly , I kind of feel guilty now that I realise its been years since I make any traditional Kuih.

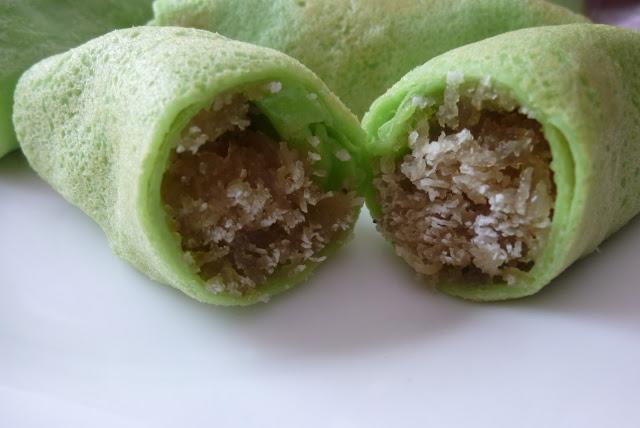
Being a Malaysian , its a norm for us to know how to make Tradiational Kuih. Probably the variety is too wide, I   suddenly do not know which kuih to make . LOL . I was flipping thru one of my favourite magazine when I saw this article about Kuih Dadar / Kuih Ketayap. Since I can't decide which kuih to make at that time, so " Kuih Dadar " will my tittle of the day then .......

I would describe this kuih as simple yet delicious . !!
The aromatic coconut filling makes this kuih irresistible. Well , as usual , my " Kuih Dadar " didn't last more than 1 hour on the serving plate . ;)


KUIH DADAR 

Ingredients

For Crepes
1 cup     All Purpose Flour / Plain Flour
2           Eggs
1 cup    Water
1 tsp     Salt
2 tbsp   Oil
1tbsp    Pandan Paste
For Filling 
2 cups   Grated Coconut
1/2 cup  Palm Sugar
1/4 cup  Water
A pinch of Salt

Method 


  • To make the filling : In a sauce pan, combine palm sugar and water . Cook over low heat until palm sugar melted. Once the sugar melted , add in grated coconut and stir constantly until all water absorbed and grated coconut turn glossy and moist. Add in salt and stir for another minute. Dish up and set aside. 
  • To make the crepe: Mix all ingredients till smooth then strain . 
  • Heat up a non-stick pan , brush some oil on the pan . Pour 2 tbsp crepe mixture on the pan and swirl it to get an even batter . Cook over low heat until the side starts to pull of the pan , flip the crepe and cook for another 20 seconds. 
  • Remove crepe fromt the pan and place it on a chopping board. Place 2 tsp of filling on the crepe and roll it up like a spring roll. Enjoy your Kuih Dadar ;) 
Recipe adapted from My Kitchen Snippets


I am submitting this post to Aspiring Bakers #12: Traditional Kueh ( October 2011 ) hosted by SSB of Small Small Baker